
How to create a newspaper with free Canva templates: a step-by-step guide
If you’re looking to create a newspaper using Canva, you’re in the right place. We've been helping creative folks design and print custom...
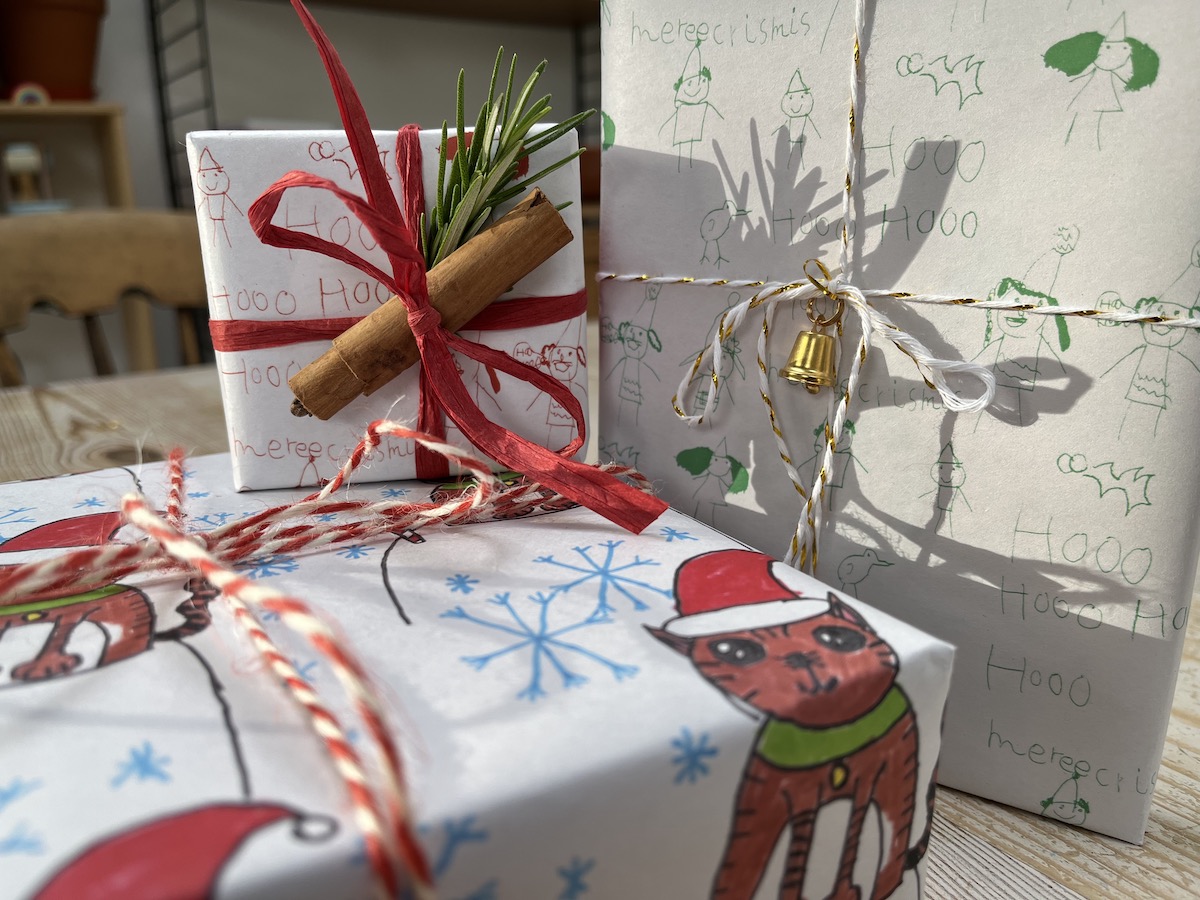
Looking for a fun, festive project this holiday season? How about creating your own custom wrapping paper – on 100% recyclable newsprint!
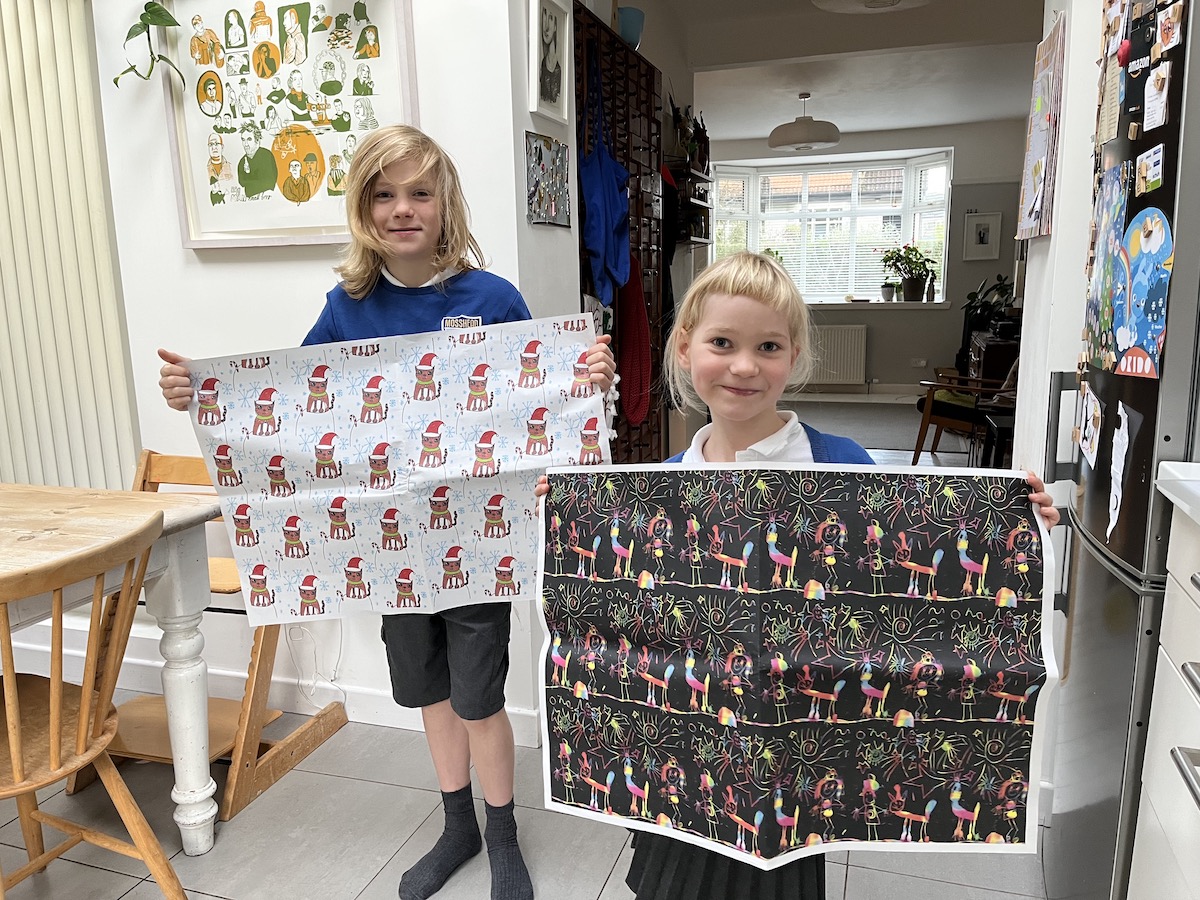
Our support assistant Silje teamed up with her creative kids, Ona (6) and Hunter (9), to transform their drawings into totally unique wrapping paper designs – complete with an appearance from the family's cat, Boo.
"Ona and Hunter were super proud when they saw their drawings turned into something with a function," says Silje. "And it’s been a lovely surprise for friends and family to receive their gifts wrapped in the kids’ artwork!"
Ready to make your own? Below, Silje outlines each step to design and print your own wrapping paper (bonus: it’s 100% recyclable).
Jump to a specific section in the guide:
• Why make your own wrapping paper?
• What you need
• Choosing your size and paper
• Designing your wrapping paper (including how to make a repeating pattern)
• Setting up your PDF and getting ready to print
• The results!

Why make your own wrapping paper?
Ona loves drawing and Hunter loves making stuff. And I loved the idea of wrapping presents for family and friends in the kids’ designs. Seeing their own drawings turned into wrapping paper was really exciting for them!
As lovely as it is to give or receive a beautifully wrapped gift, wrapping paper is also one of the biggest seasonal waste culprits at Christmas time. It’s estimated that in the UK we use about 227,000 miles of wrapping paper annually – enough to go around the earth nine times!
It’s easy enough to steer away from wrapping paper with foil or glitter, knowing these will need to go straight to landfill. But it’s not always that easy to tell if a wrapping paper is recyclable as some contain a plastic coating, also making them unfit for recycling.
When using newsprint, however, you can wrap up with a clear conscience. All of our paper types are 100% recyclable (or home-compostable!) and are produced from sustainable sources.
What you need
• Drawing or painting tools
• Paper (maximum A4 size if using a standard scanner)
• A scanner or a decent phone camera
• Software – Photoshop (or Canva) to clean up your artwork/create a pattern and InDesign (or Scribus)
• Newspaper Club samples – Our free sample packs include all sizes and paper types with colour charts and printing tips. They’re handy to reference as you work on your design (but you can skip this if you’re short on time!)
Choosing your size and paper
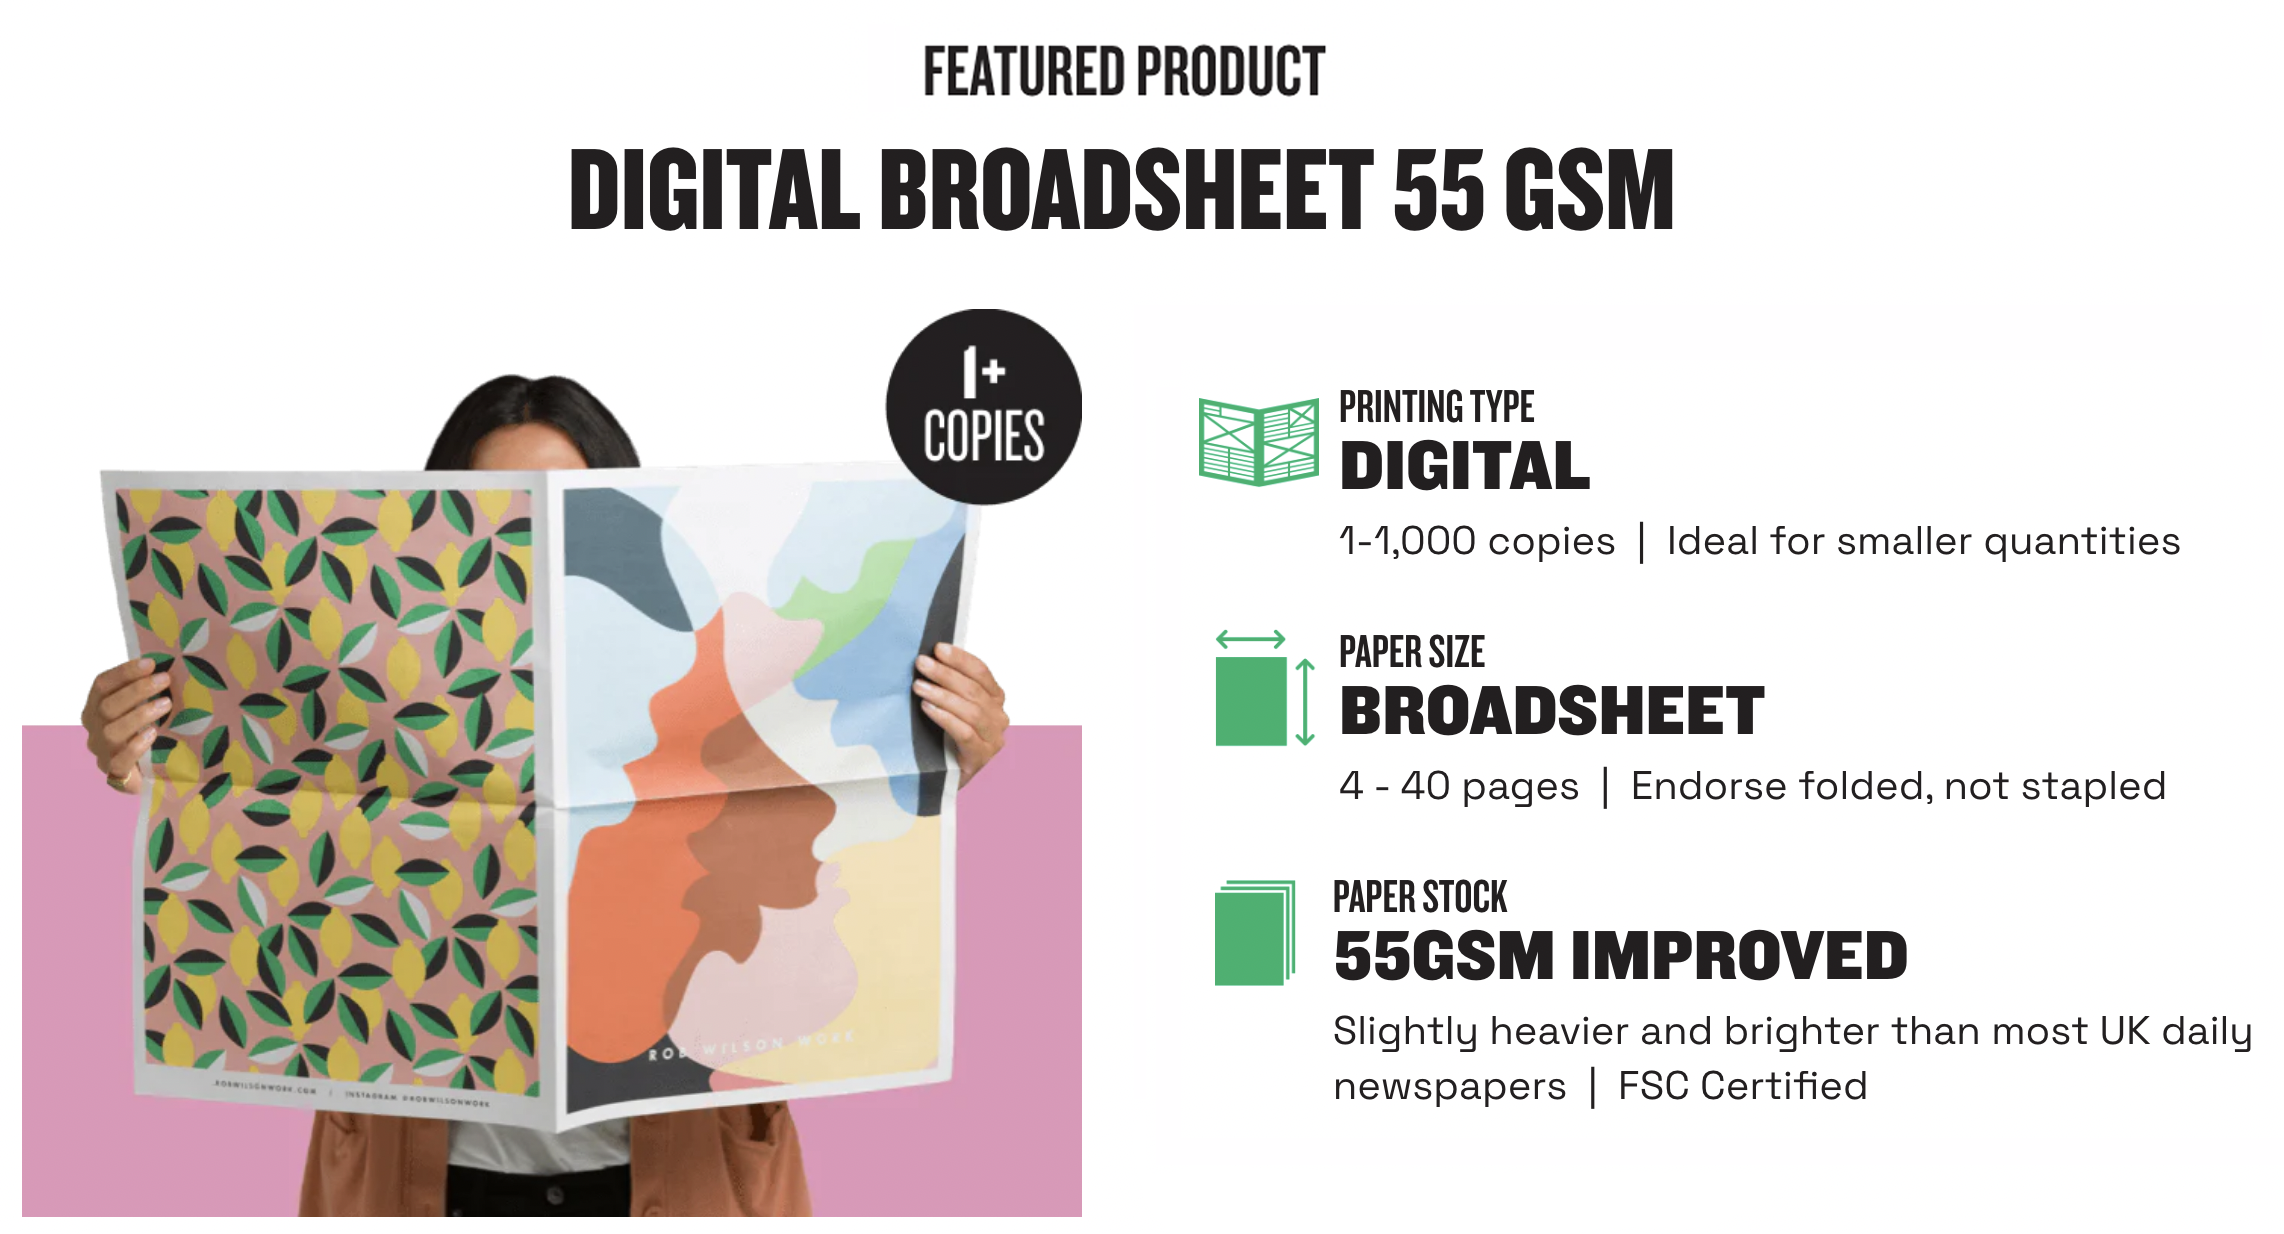
We used Newspaper Club’s digital broadsheets for our wrapping paper. They’re our biggest size so offer the most surface area, but digital tabloids also work well if you want smaller sheets. When unfolded the dimensions are:
Digital broadsheet spread: 700mm x 500mm
Digital tabloid spread: 380mm x 578mm
Broadsheets are only printed on 55gsm improved newsprint, but tabloids can be printed on 45gsm salmon or 80gsm bright recycled as well. (I always love seeing our customers’ artwork printed on the salmon paper, so I’m planning to try this for our next batch!)
Use free templates
After you’ve decided on a size, you can use our free templates when you design your newspaper. They’re all set up to the correct size with guidelines for margins, so you just need to add your artwork. We have templates for InDesign or Scribus, which is a free, open-source alternative to InDesign.
• Digital broadsheet template for InDesign/Scribus
• Digital tabloid template for InDesign/Scribus
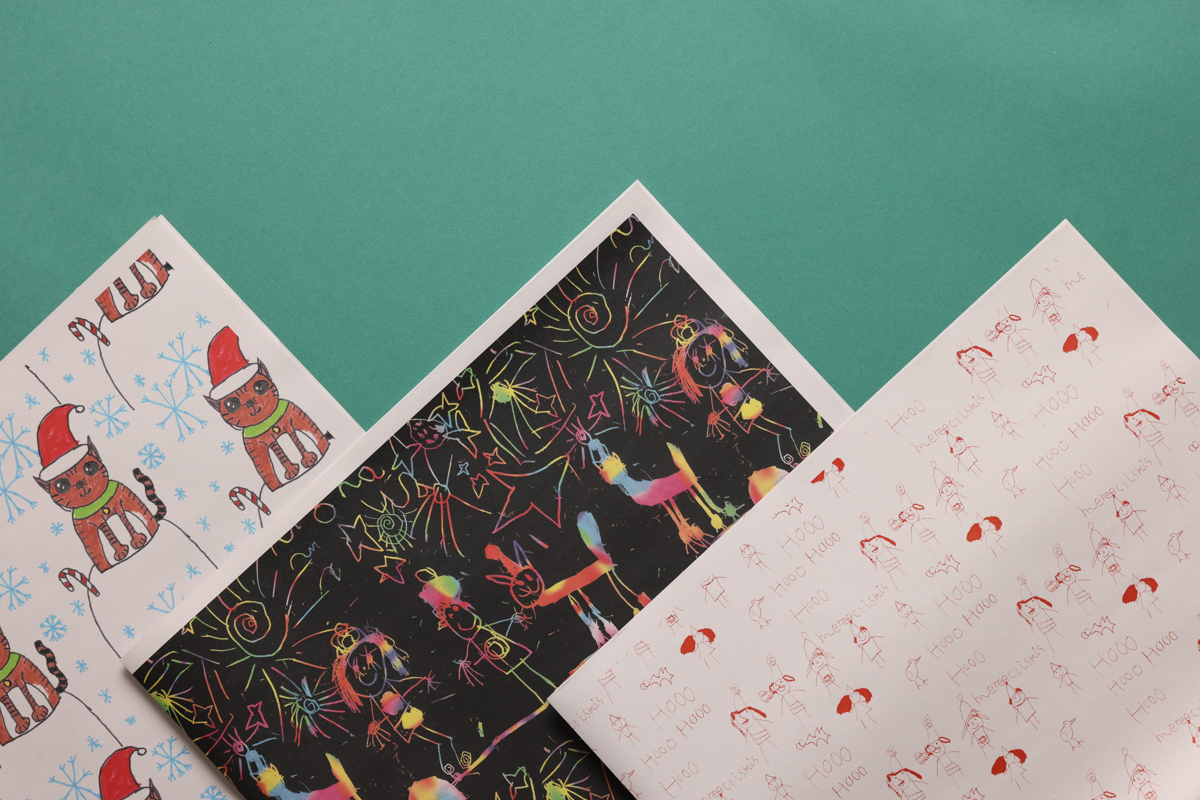
Designing your wrapping paper
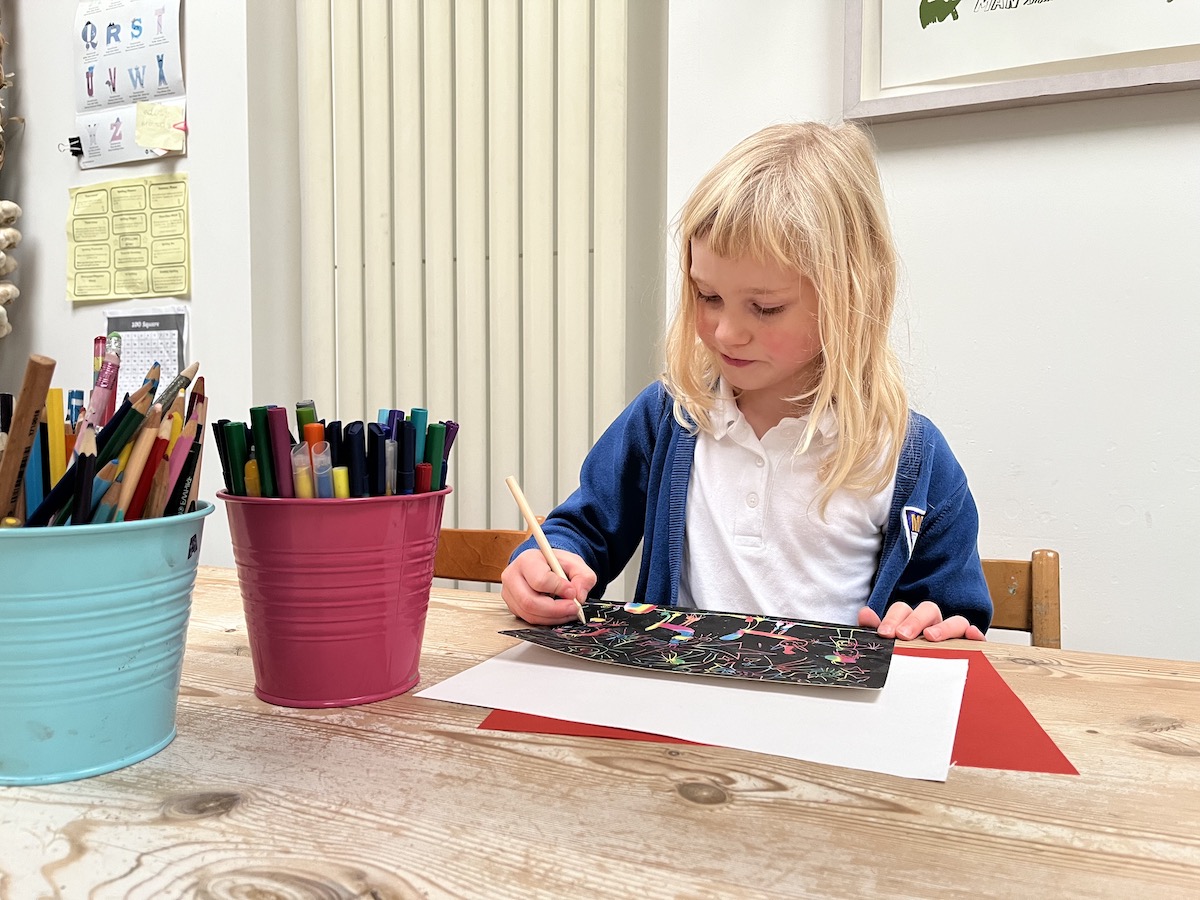
Create your artwork
Wrapping papers tend to consist of artwork that is repeated. It’s easier to work with freestanding elements than a full-page drawing that runs all the way to the edge of the paper. (Though this can work well too!)
Bold lines and strong colours look great and patterns are pretty forgiving, so imperfections and loose lines can add to the overall flow and make the transitions between repeats less obvious.
Ona, especially, got very enthusiastic and we ended up creating 7 designs overall. She made some drawings with the Christmas wrapping paper design in mind, but also wanted to create designs for wrapping birthday presents.
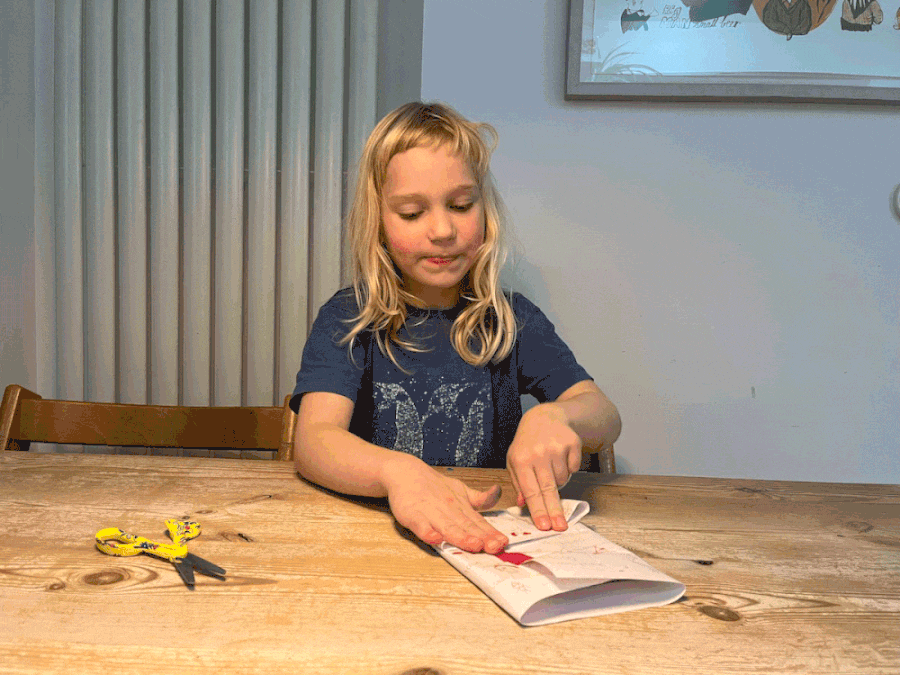
Clean up your artwork
If you’re creating your artwork on paper, you’ll need to scan it (or photograph it) and clean it up on your computer. I used Photoshop to do this, but you can use any photo editing or design software (like Canva).
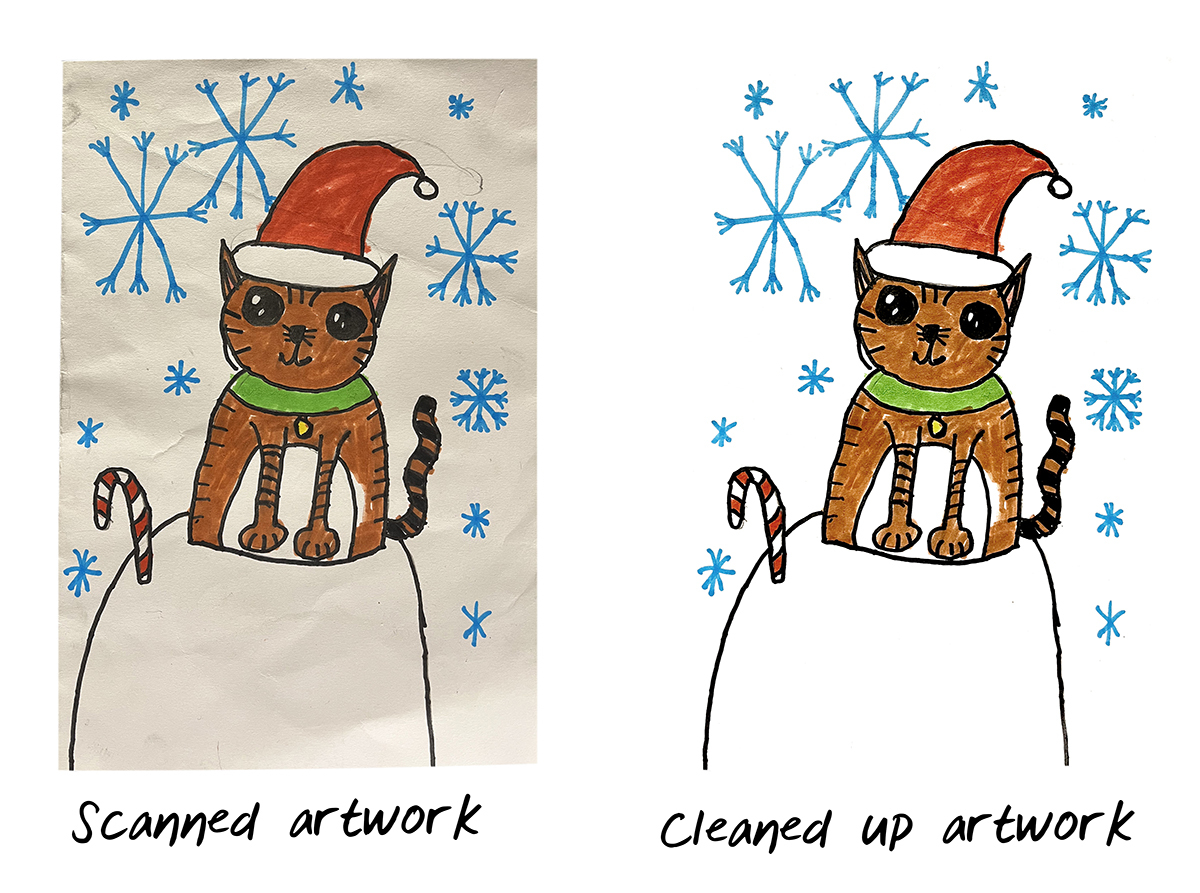
For the artwork above, I boosted the colours/contrast and adjusted the levels (Image > Adjustments > Levels) to remove the texture of the paper and get a bright white background. This makes it much easier to create a seamless pattern.
How to make a repeating pattern
After you’ve cleaned up your artwork, it’s time to turn it into a pattern! There are various ways you can generate the pattern and you can find lots of tutorials on YouTube.
But here’s my method using Photoshop:
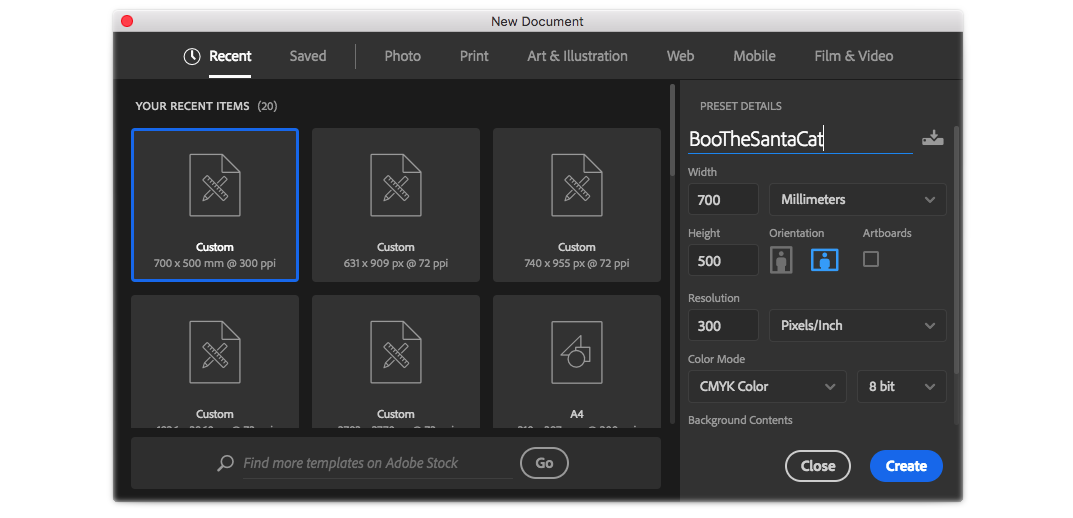
1. Set up a new document to the size of a digital broadsheet spread (500 x 700mm) or a tabloid spread (380mm x 578mm) and set the resolution to 300dpi:
2. Copy and paste the artwork into the new document.
3. Resize the artwork to the size you would like each repeated element to be.
4. Copy and paste the resized artwork and position it next to the original – you should now have 2 separate layers of artwork. Apply the multiplying filter so the layers blend together if there is any overlap (Layers > Layer Style > Blending options > Blend mode: multiply or use the drop-down menu in the Layers Panel)

5. This is where you can start playing with the pattern composition. The flow of the pattern often looks best if the repeated elements are diagonally offset from each other, like this:
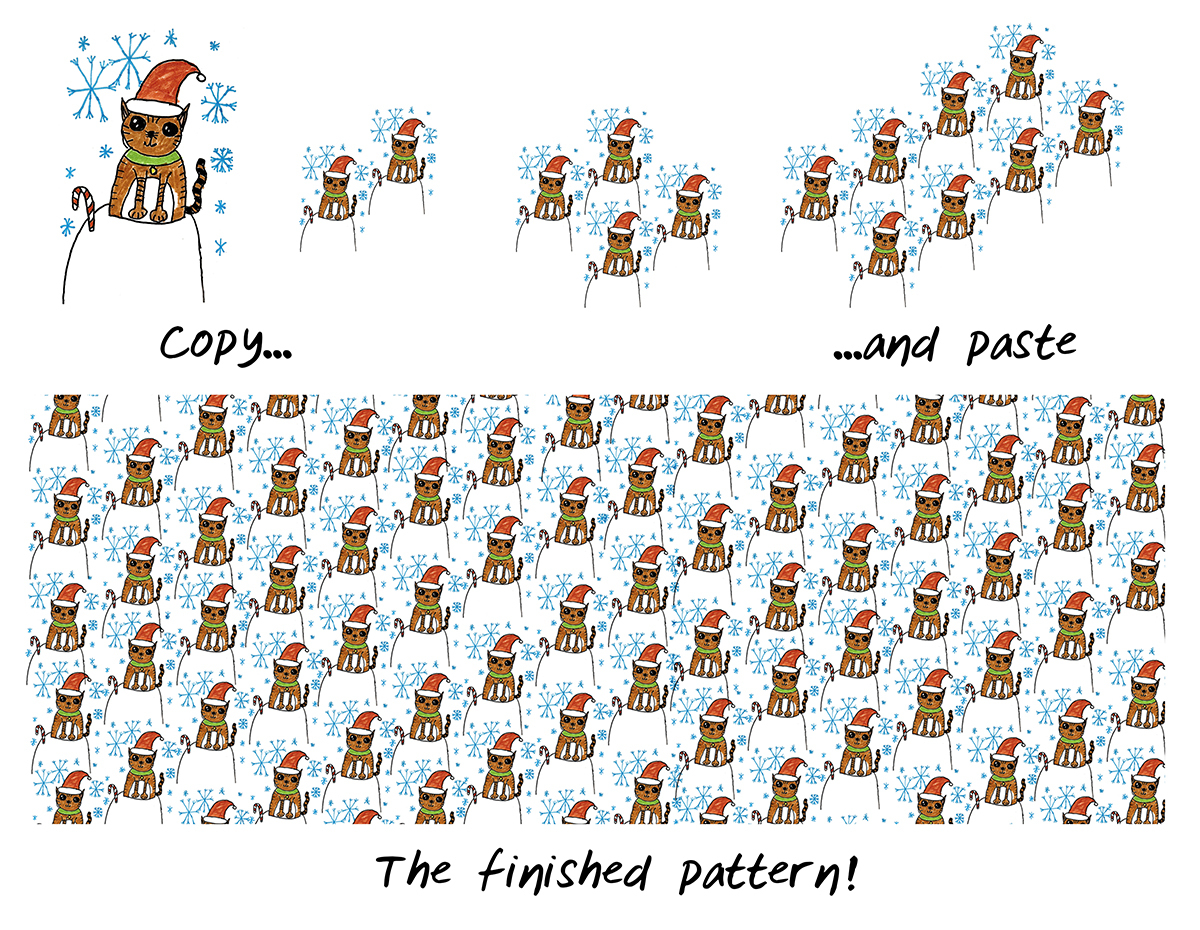
6. Once you’re happy with the positioning, copy and paste both layers and repeat step 4. Next time you will have four elements to copy and paste, and then just keep repeating this step until you have filled the whole canvas. Let the artwork run off the page (we will add margins later).
7. Merge all the layers and save the image as a JPEG file.
Alternatively, you can use the offset filter to create a tile that you can then use to generate seamless repeats. But since my starting point was a selection of kids’ artwork on paper, I found it just as easy to repeatedly copy and paste the artwork to create my pattern.
After you’ve created your design, you need to turn it into a printable PDF. If you’re printing multiple different designs, it’s useful to create a paper dummy – you can see how to do this in our poster guide.
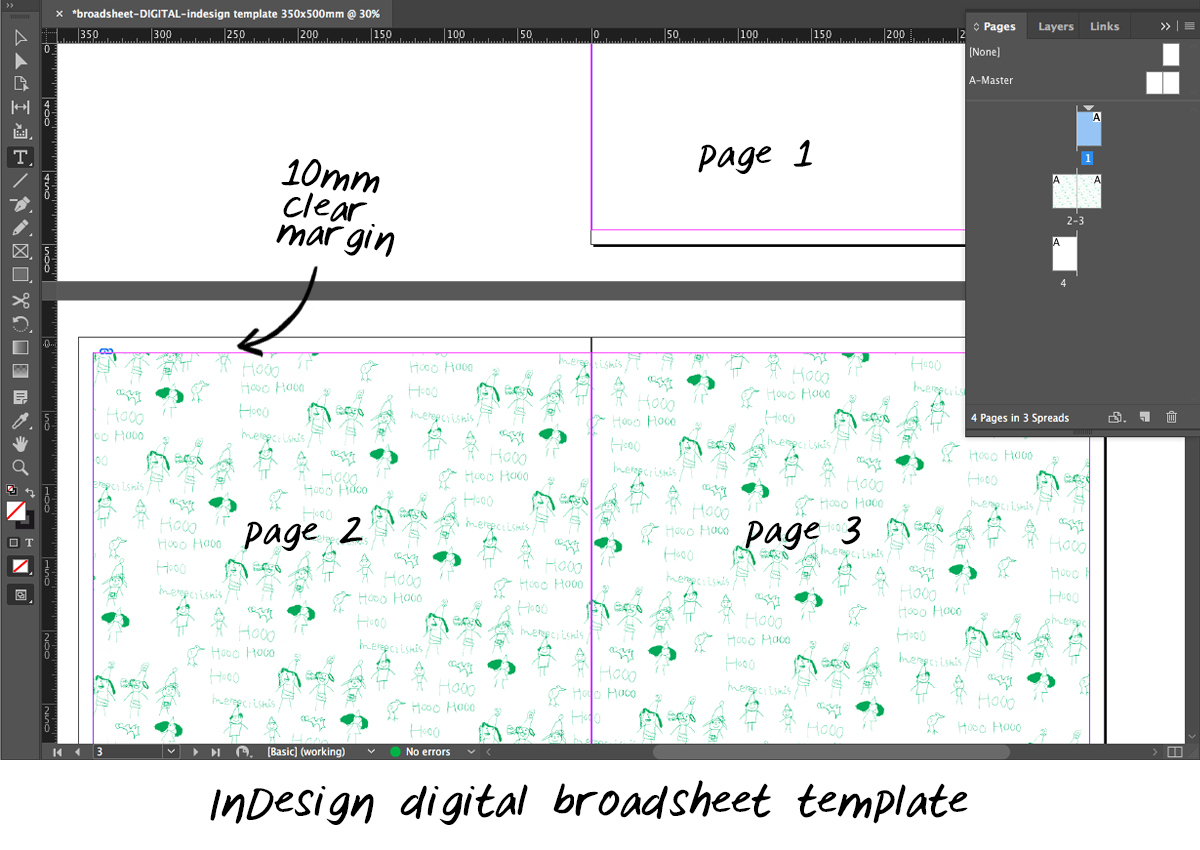
1. Open our digital tabloid or digital broadsheet template in InDesign/Scribus.
2. For a single-sided design, make your InDesign document 4 pages. Lay the artwork out across pages 2-3 and leave the first and last page blank.
3. Adjust the artbox so that the artwork does not run into the margins. (The printable area for the digital broadsheets measures 480mm x 680mm).
4. If you want to print several, single-sided designs, leave a blank spread between each design. (White worked best for our design, but you could also use a solid colour – just be mindful of show-through!)
5. Export the artwork as a PDF following our export guidelines.
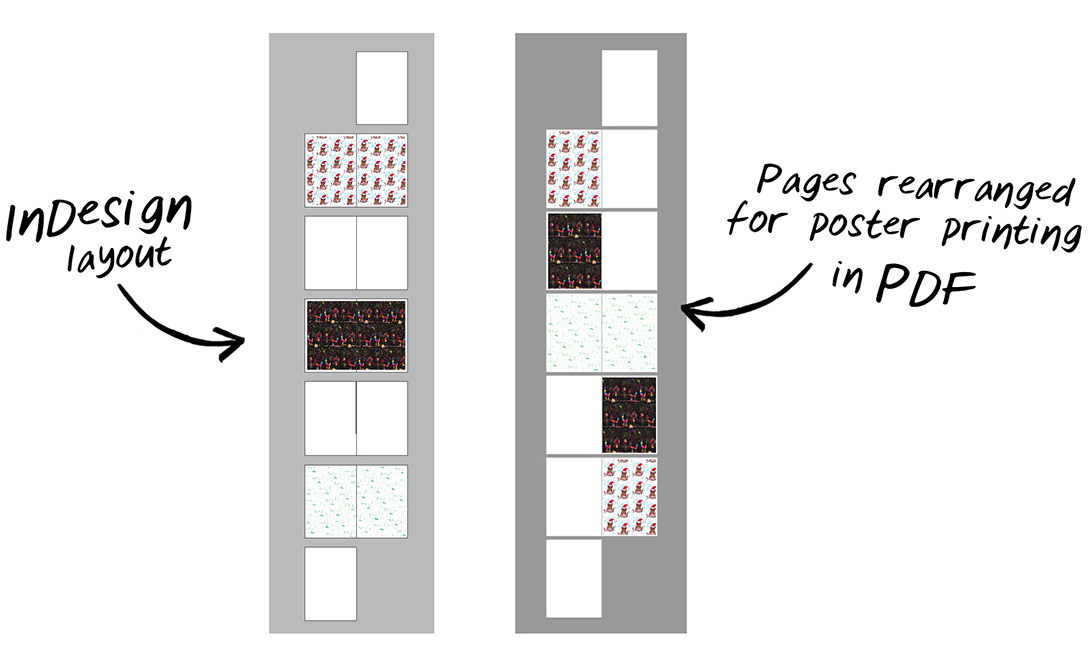
6. Finally, rearrange the page order so the wrapping paper will print as posters – follow the steps in our poster guide. Make sure your final PDF has pagination in multiples of four.
Here's how my InDesign layout compares to my final PDF:
Now you should be ready to upload your PDF to your Newspaper Club account and place your order!
If you’re not sure if your wrapping paper is set up correctly, our team is happy to check your file – just email us at support@newspaperclub.com.

The results!
Ona and Hunter were super proud when they saw their designs turned into something with a function. They thought they looked very ‘professional’!
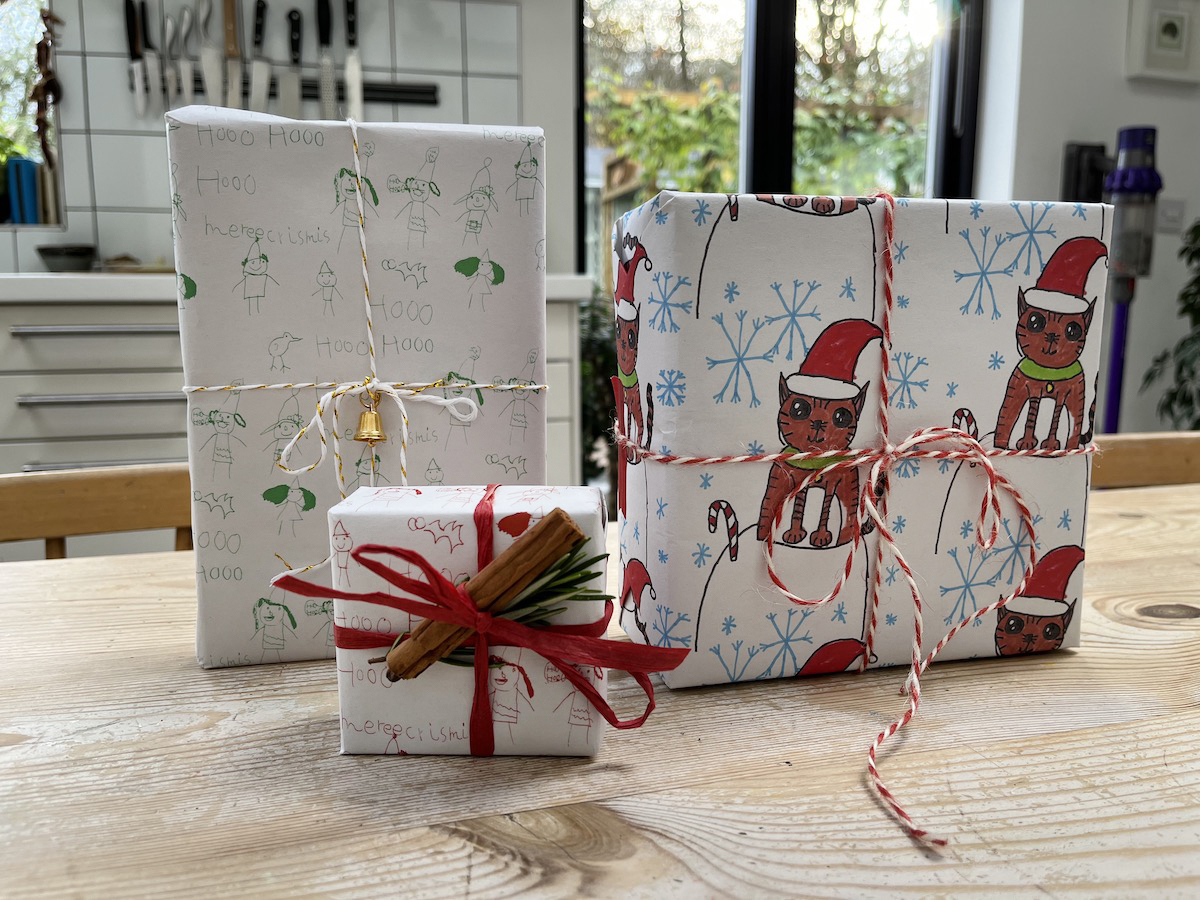
Ona’s already been busy wrapping some presents and it’s been a lovely surprise for friends and family to receive their gifts wrapped in the kids’ artwork. We’ll definitely be making lots more – in fact, I have a feeling our days of using shop-bought wrapping paper may be numbered!
If you’re looking to create a newspaper using Canva, you’re in the right place. We've been helping creative folks design and print custom...

Weddings are full of stories – how you got engaged, why you chose your venue or the flowers in your bouquet and all the little decisions...

So much thought goes into every part of your wedding, from the venue to the playlist to the colour of the napkins. But there’s only so...